TL;DR
Moving your rig out of sight and using strategic placement with proper ventilation beats buying endless foam. A closet rig can be nearly silent and sound great if you treat reflection points and control heat.
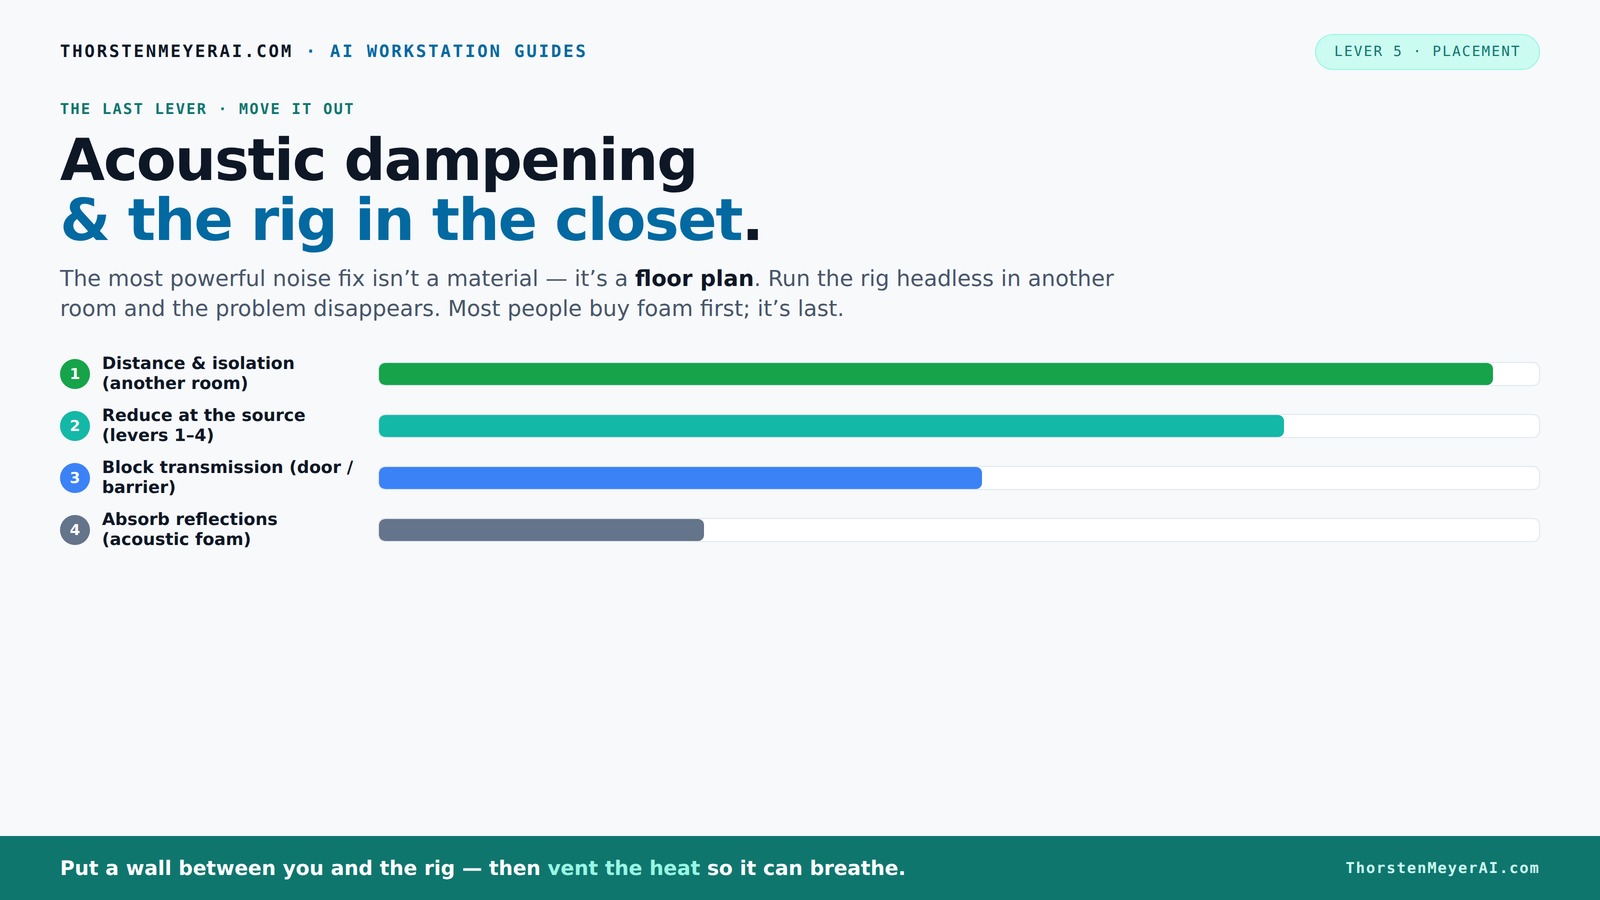
Acoustic dampening
& the rig in the closet.
The most powerful noise fix isn’t a material — it’s a floor plan. A rig you can’t hear because it’s in another room beats any amount of foam. Tap the approaches in Part 1 to see what actually works.
(another room)
(levers 1–4)
(door / barrier)
(acoustic foam)
Contain the noise, not the heat
Key Takeaways
- Moving your rig into another room or closet is the most effective noise reduction technique.
- Proper ventilation and airflow are critical when placing a machine in a sealed space.
- Treat the primary reflection points — behind the mic, ceiling, and side walls — with thick, targeted absorption.
- Corners are key for controlling low-frequency buildup; bass traps are your friends.
- Don’t overdo it with foam; balance absorption with diffusion to avoid dead, unnatural sound.
soundproof closet for computer setup
As an affiliate, we earn on qualifying purchases.
As an affiliate, we earn on qualifying purchases.
Why Moving Your Rig Is the Most Powerful Noise Fix
When it comes to quieting a noisy rig, distance beats all other tricks. Think about it: a GPU or mining rig in another room is inaudible compared to one sitting on your desk. This isn’t just about convenience; it’s rooted in the physics of sound propagation. Sound intensity diminishes with distance, so even a small separation can drastically reduce perceived volume. Additionally, placing the rig away from your primary workspace minimizes direct reflections and airborne noise that reach your ears.
However, this approach has tradeoffs. You need reliable network connectivity to control and monitor the machine remotely, and proper ventilation becomes critical to prevent overheating. The key is understanding that physical separation isn’t just a quick fix; it fundamentally alters the acoustic environment, reducing the need for complex soundproofing and absorption treatments. This method emphasizes that sometimes, the best solution is to eliminate the problem at its source rather than trying to contain it.
quiet PC case for noise reduction
As an affiliate, we earn on qualifying purchases.
As an affiliate, we earn on qualifying purchases.
The 'Rig in the Closet' Setup — How to Do It Without Overheating
Placing a high-performance computer or audio rig inside a closet is tempting for noise control, but heat management is the critical challenge. Without proper ventilation, heat can build up rapidly, causing components to throttle performance or even fail. Overheating not only compromises your hardware but can lead to louder fan noise as fans spin faster to compensate for rising temperatures. The tradeoff here is between silence and thermal safety. Understanding fabrics and ventilation options can help optimize this balance.
To mitigate this, effective ventilation strategies are essential. Passive vents alone may be insufficient; active airflow solutions like ducted exhaust fans or even small, quiet inline fans can help maintain safe operating temperatures. Installing a dedicated venting system with temperature sensors allows for dynamic control — fans only ramp up when necessary, maintaining a balance between noise and cooling. Using purpose-built soundproof cabinets with ducted airflow and temperature monitoring can optimize this process, providing both acoustic isolation and thermal efficiency.
For instance, a DIY setup with a small exhaust fan, rubber grommets for vibration isolation, and a vented door can keep a closet rig running at 65°C while maintaining noise levels below 30 dB. The key is understanding that ventilation isn’t an afterthought — it’s integral to making a closet rig viable without risking hardware damage.
acoustic treatment panels for studio
As an affiliate, we earn on qualifying purchases.
As an affiliate, we earn on qualifying purchases.
Acoustic Dampening vs. Soundproofing — Know the Difference Before You Spend
Understanding the distinction between acoustic dampening and soundproofing is vital because they serve different purposes and involve different tradeoffs. Learn more about acoustic treatments. Dampening focuses on reducing reflections, echoes, and internal reverberations within a space — making recordings clearer and more natural. It improves the internal sound quality but doesn’t necessarily block sound from escaping.
Soundproofing, on the other hand, aims to prevent sound from leaking out or entering from outside sources. It involves adding mass, sealing gaps, and decoupling surfaces to create a barrier. Each approach has its implications: dampening may make your space sound better internally but won’t stop noise from disturbing neighbors, while soundproofing can be expensive and may alter room acoustics significantly.
Choosing the right focus depends on your goals. If your aim is to improve recording clarity within a small space, dampening is key. If noise leakage is a concern, soundproofing measures are necessary. Often, combining both — with an emphasis on strategic placement of dampening materials — provides the best overall result. Recognizing these differences helps you prioritize investments and avoid wasting money on ineffective treatments.
computer noise dampening enclosure
As an affiliate, we earn on qualifying purchases.
As an affiliate, we earn on qualifying purchases.
Where to Place Absorptive Material for the Best Closet Soundproofing
Placement of absorptive materials is crucial because it directly impacts how effectively reflections are controlled. Find out more about proper placement. The first step is to identify the primary reflection points — typically the wall directly behind your microphone or sound source and the surfaces where sound bounces before reaching your ears. Treating these points with thick foam or acoustic panels reduces early reflections that cause muddiness.
Next, focus on the ceiling and side walls near your listening or recording position. Placing absorptive materials at these points minimizes flutter echoes and internal reverberation, resulting in clearer recordings and more accurate monitoring. Layered blankets or thick foam can be used for flexibility and cost-effectiveness, but ensure they are positioned at the reflection points for maximum benefit. For example, a streamer improved vocal clarity significantly by strategically placing foam panels at reflection points on the ceiling and walls, demonstrating that targeted placement outweighs random coverage.
Don’t neglect the door — hanging a heavy blanket or acoustic curtain can prevent sound leaks. Treating the corners with bass traps is particularly effective for low-end control, preventing boominess and muddiness. Placing a rug or carpet on the floor reduces reflections from a reflective surface, further improving sound quality. The key is understanding that targeted placement, not just coverage, makes the difference in a small, reflective space.
How Corners and Walls Differ in Their Impact on Sound
Corners are critical zones because they tend to accumulate low-frequency energy due to boundary effects. See how to treat corners effectively. Thick bass traps installed in upper corners absorb these deep rumbling sounds, preventing them from causing muddiness or boominess in your recordings. Walls, especially those facing reflection points, influence the overall reverberation and echo within the room. Proper treatment of walls helps control mid-range reflections and reverberations, improving overall sound quality. Learn about wall treatments. and high frequencies, making the space sound more controlled and natural.
For example, placing 4-6 inches of mineral wool or foam in the upper corners can significantly reduce low-end buildup, which otherwise causes vocals to sound boxy or boomy. Meanwhile, treating reflective walls with panels at strategic points minimizes flutter echoes and helps achieve a balanced sound profile. The tradeoff is that corner treatment mainly impacts low frequencies, whereas wall treatment affects the mid and high frequencies. Combining both ensures a comprehensive approach that addresses the full spectrum of sound issues, leading to clearer, more professional recordings.
How Much Treatment Is Enough? The Coverage Guide
Achieving a balanced acoustic environment involves strategic coverage. Covering about 20-30% of reflective surfaces, especially at critical reflection points like the wall behind the mic, the ceiling, and the door, provides noticeable improvements without overly deadening the space. Excessive absorption can make a room sound unnatural, dulling the natural liveliness needed for accurate recordings.
Focus on placing panels at the primary reflection points identified through listening or using mirror tests. Layering foam panels with blankets or bass traps in corners can enhance low-end control without sacrificing clarity. For example, a combination of foam at reflection points and bass traps in corners resulted in a more natural, balanced sound in a small closet setup, illustrating that moderation and targeted placement are key.
The goal is to find the sweet spot where reflections are controlled enough to prevent muddiness but the space still retains some liveliness. Small incremental adjustments often yield the best results, as over-treatment can lead to a sterile sound that lacks character.
Foam, Blankets, or Rigid Panels — Which Works Best?
Choosing the right material depends on your specific goals and space constraints. Thick foam panels are excellent for controlling mid and high frequencies, offering a clean, professional sound. However, for low-frequency control and leakage reduction, layered blankets or rigid bass traps are more effective because they can absorb a broader range of frequencies and provide better sound isolation.
Layered blankets are versatile, affordable, and easy to hang, making them suitable for quick setup and adjustments. Rigid panels, especially with air gaps behind them, excel at broad-spectrum absorption, reducing both reflections and leakage. For example, a DIY vocalist used moving blankets over the closet door and foam on the walls, achieving a balanced sound that improved clarity while keeping noise contained. The choice ultimately depends on your priorities — clarity, leakage control, or bass management — and how much effort you want to invest in installation.
Common Mistakes That Turn a Closet Into a Dead Sound Trap
Over-treating a space by covering every surface with foam or blankets can deaden the room excessively, leading to unnatural, muffled vocals and recordings. Conversely, neglecting to treat reflection points or corners results in a space that sounds echoey or boxy, impairing clarity. Additionally, treating surfaces with parallel panels without diffusion can cause standing waves, creating uneven frequency response and coloration.
Sealing gaps in the door with weatherstripping or acoustic seals prevents sound leaks but must be balanced with proper airflow to avoid overheating. An example is a home streamer who added foam to all four walls and the ceiling but ended up with a boxy, muffled sound. The fix was removing some panels and incorporating diffusion elements, restoring naturalness. The key is to strike a balance: use absorption strategically at reflection points and corners, incorporate diffusion to maintain liveliness, and avoid overcoverage that results in a dead, unnatural sound.
Measuring Success: How to Tell if Your Closet Is Sounding Better
Listening carefully remains the most practical method for evaluating improvements. Notice reductions in echo, muddiness, and low-end boominess. Recording a test voice or instrument before and after treatment provides tangible evidence of progress. If the sound becomes clearer, more natural, and less cluttered, your treatment is effective.
For more precise analysis, free tools like Room EQ Wizard allow you to visualize frequency response and identify problem areas. This data-driven approach can guide further adjustments, such as adding bass traps or repositioning panels. Remember, small tweaks—like repositioning a panel or adding a bass trap—can yield significant improvements, so iterative testing is key to optimizing your space.
Frequently Asked Questions
How much space do I need to turn a closet into a good vocal booth?
A closet around 4x4 feet with at least 7 feet of height is manageable. The larger and taller, the better for sound diffusion and low-end control, but even small spaces can work with proper treatment and placement.Is acoustic foam enough for a closet studio, or do I need other materials?
Foam helps control echo and reflections, but for low frequencies and leakage, layered blankets, bass traps, and sealing gaps are necessary. Combining materials yields the best results.Can I put my rig in a closet without overheating it?
Yes, but ventilation is key. Use passive vents, exhaust fans, or ducted airflow to keep temperatures safe. Check out [this guide](https://thorstenmeyerai.com/reduce-heat-noise-ai-workstation/) for detailed cooling strategies.How do I stop sound leaking through gaps around the door?
Seal gaps with weatherstripping, acoustic door seals, or hang a thick blanket over the door. For best results, treat the door surface with absorption or add a door sweep.Will a small closet cause my vocals to sound boxy or boomy?
Small spaces tend to cause reflections, but proper treatment — especially in reflection points and corners — reduces boxiness. Use bass traps and diffusers to maintain natural sound.Conclusion
The best way to quiet your rig and improve sound isn’t just about buying more foam. It’s about smart placement, effective ventilation, and targeted treatment. When you put your noisy machine in a closet or another room, you’re not just hiding the noise — you’re eliminating it.
Imagine working in a peaceful space, free from the constant hum and whine. That’s the real power of a well-thought-out closet setup. Use these tips to turn your noisy corner into a silent sanctuary — your ears will thank you.